[WSO2 Open Source Enterprise Solutions] Integration: People-HR
Products:
WSO2 ESB, WSO2 DAS, WSO2 Developer Studio and WSO2 IOT Server.
WSO2 ESB Connectors facilitates you to connect with external systems and manipulate those data. Connectors are connected with the WSO2 Enterprise Service Bus (WSO2 ESB), which is a lightweight, high performance, comprehensive ESB.
Introduction
Intention of this article to demonstrate one of the real world usage of wso2 products. According to the provided architecture [Figure 1.0.0], this article will cover-up some usage of WSO2 developer studio, WSO2 Enterprise Service Bus (ESB) and WSO2 Data Analytics Server (DAS).
Nowadays most of the organizations are using external systems to manage their process, management task and activities, such as Salesforce for sales, Pardot for marketing, People-HR for managing human resource...etc. This article explain, how to connect external system using WSO2 ESB connectors by providing a sample configurations using people-HR connector.
Nowadays most of the organizations are using external systems to manage their process, management task and activities, such as Salesforce for sales, Pardot for marketing, People-HR for managing human resource...etc. This article explain, how to connect external system using WSO2 ESB connectors by providing a sample configurations using people-HR connector.
100% open source, WSO2 ESB effectively addresses integration standards and supports all integration patterns, enabling interoperability among various heterogeneous systems and business applications.
Most of the organizations today use external applications to manage their human resource data, performance management and workflows...etc. One of the popular application for that is People HR. I will use WSO2 PeopleHR connector to retrieve the data from people HR. [Figure 1.0: is the architecture diagram for the solution that we are going to address].
[Note: You can use the intermediate activities with other integration scenarios as well.]
What are we going to do:
- Stream those data to WSO2 DAS.
- Store those data in a external database.
- For this tutorial we are not using DAS to store and manipulate inside (I will demonstrate that in a later tutorial, once the DAS 3.1.0 released).
- Why do we use an external database.
- Data correlation (Could correlate with other organizational data).
- We might need to update the row data, without overwriting them.
- Also you will get an idea about connecting and retrieving data from an external datasource.
- Retrieve data from the database and develop dashboard gadgets.
- For this you can use either standalone WSO2 dashboard server, or you can use the dashboard component which comes with the WSO2 DAS it self.
- Display dashboard in display devices and manage them using WSO2 IOT Server.
 |
Figure 1.0.0: Architecture Diagram |
In-order implement the above solution following are the resource that you needed to have, from the provided links you can download the stable version of the application.
WSO2 Products:
- WSO2 Developer Studio - Link to download
- WSO2 People HR connector (download from the connector store)- Link to download
- WSO2 Enterprise Service Bus - Link to download
- WSO2 Data Analysis Server - Link to download
- WSO2 IOT Server (optional) - Link to download
- WSO2 Dashboard Server (optional) - Link to download
Note: WSO2 IOT Server 1.0 will generally available from 2016 Q3.
Non WSO2 products:
- People HR- You need to have a People HR account to retrieve the data, if you don't have an account you can create a free trial account.
[Note: To install the above products you need to have the required hardware/software components which will describe along with the configurations].
Configuring People-HR.
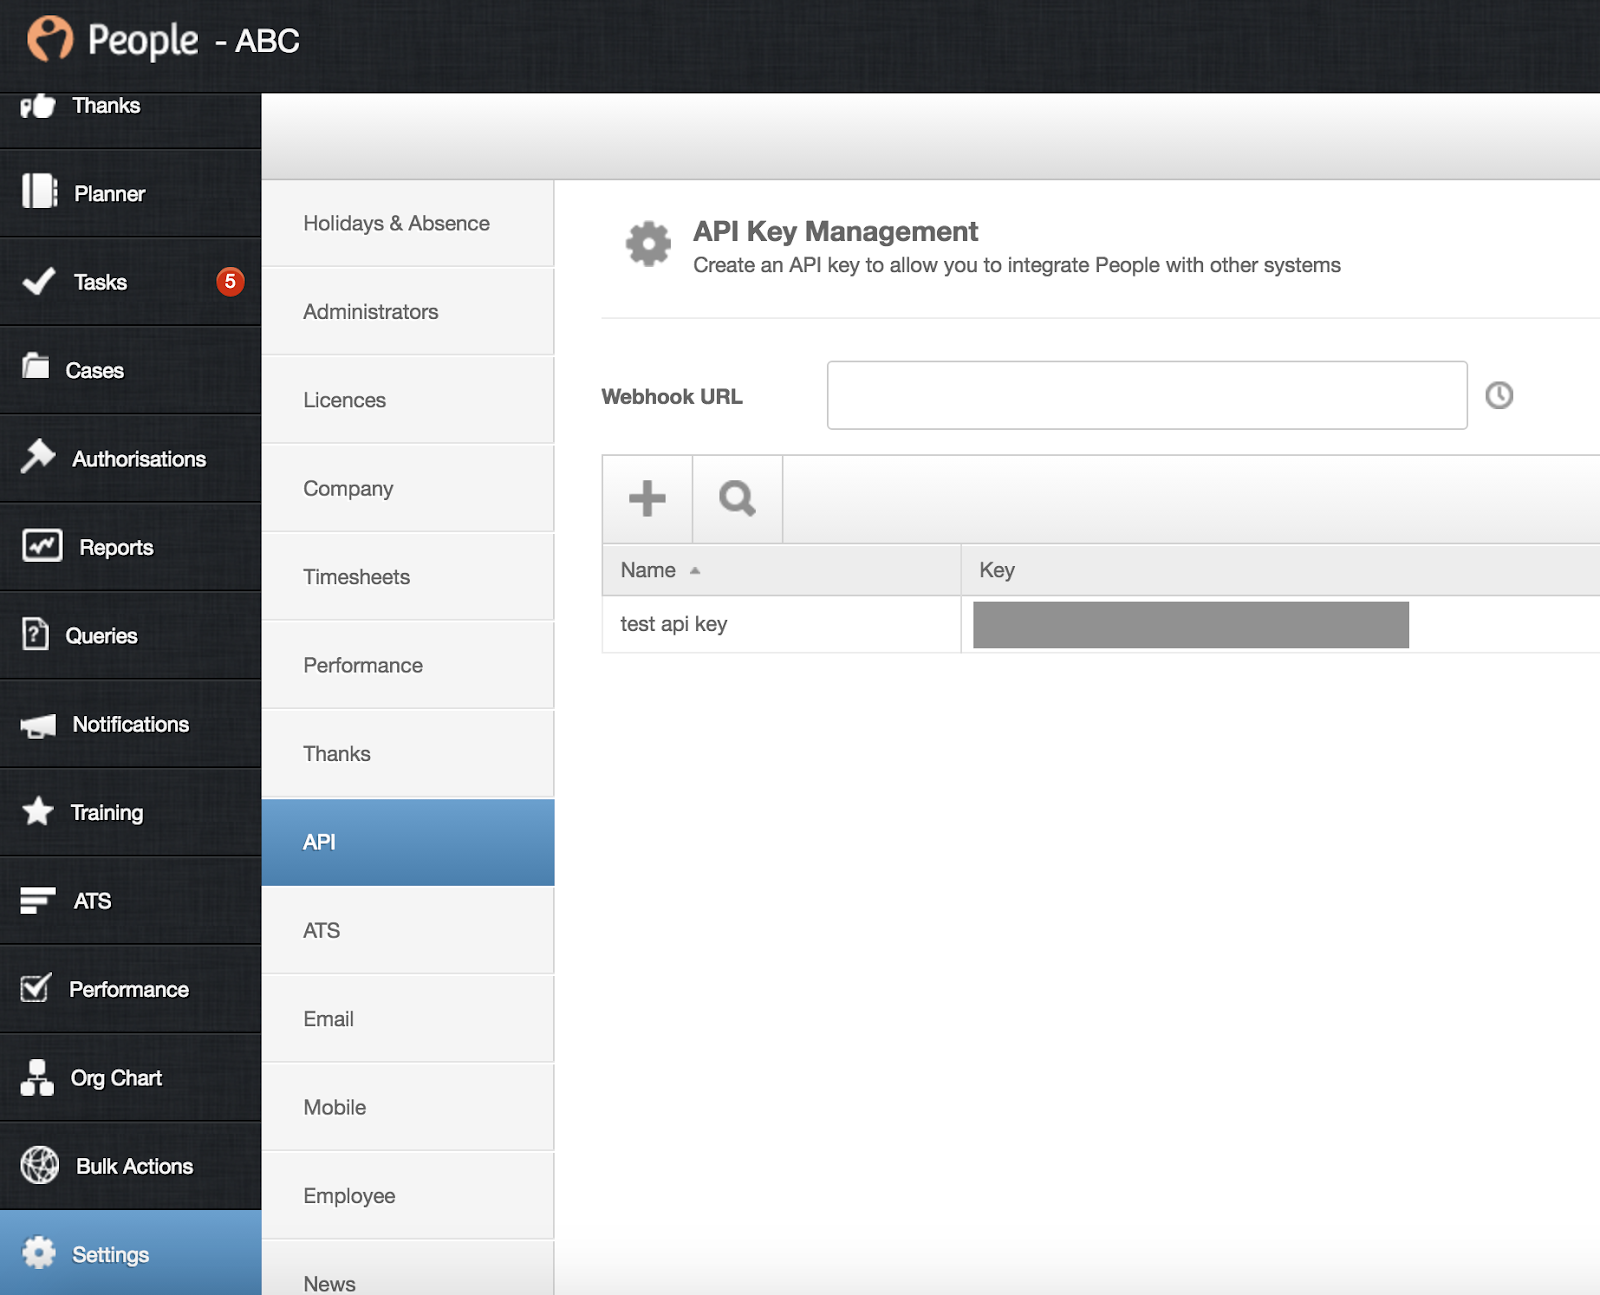
Getting the API Key
After creating the People-HR account you need to retrieve the API key.
- Login to People-HR, go to settings -> API -> Under API key management -> Create an API Key (using the '+' mark).
- Select Employee and QueryBuilder.

Then you will get your API key
Building Query
Next you need to build a query to retrieve the information that you required.
- Go to 'Queries' -> Create a new query(using '+' mark).
- Select the entities that you need to retrieve.
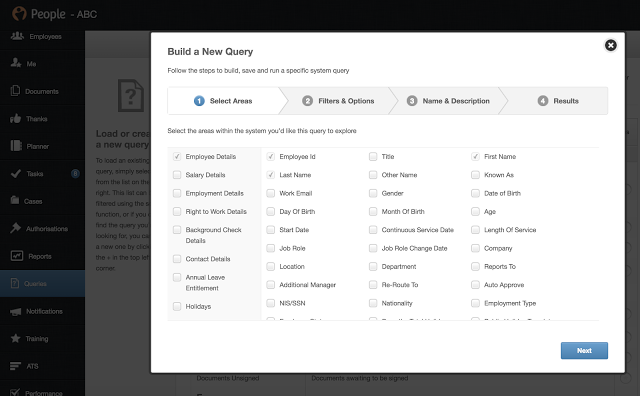
- You can just keep the filters and operations as it is (creating them is optional for this tutorial).
- Give a query name (This is unique for each query)

- After created the query you can search it by name.

Now configuring People HR is completed.
Install WSO2 DAS
- After you have completed ESB setup, download the WSO2 DAS from the provided link.
- If you are using the same server for both ESB and DAS, no need of installing the prerequisites again.
- Important : Before Starting your DAS Server please make sure you have change the port offset if you are using same server for the ESB and DAS.
You can set it in the Ports section of <PRODUCT_HOME>/repository/conf/carbon.xml as follows:
<Offset>3</Offset>
Install WSO2 Developer Studio
- After downloading the WSO2 Developer studio from the provided link, you can continue on installing it.
Install WSO2 ESB
- After downloading the ESB from the provide the link please make sure that you have the installation prerequisites in your server(or pc).
Establishing the connection between ESB and DAS.
In order to do this we need to create an Event Sink. Event sinks contain information about transport endpoints provided by other systems. Events can be published to these endpoints. Endpoint transport and authentication URLs and credentials are captured in event sinks.
Adding an event sink
Follow the steps below to add an event sink.
- Open the ESB Management Console. On the Configure tab, click Event Sinks to open the Event Sinks Configuration page.
- Click Add Event Sink to open the Add Event Sink page.

- Enter values for the following parameters.
Parameter Name
|
Description
|
| Name | The name of the event sink. |
| Username | The user name of the data-bridge endpoint. |
| Password | The password of the data-bridge endpoint. |
| Receiver URL | The URL of the data-bridge endpoint. For example, tcp://10.200.3.218:7611 (Thrift port : 7611) Multiple endpoints can be specified for load balancing and multiple receiver modes, by using the correct URL format. |
| Authenticator URL | The secure data-bridge endpoint URL that should be used for authentication. For example, ssl://10.200.3.218:7711 (Thrift SSL port : 7711) The URL specified here should match the specified Receiver URL parameter. |
[Note: If you have change the port offset of the DAS, your ‘Thrift SSL port ‘ ‘Thrift port’ should be increased by value of the offset.]
Eg: If DAS offset is 3 then your Thrift port : 7614 and Thrift SSL port : 7714
- Click Save.
WSO2 Developer Studio on implementation level
Creating Maven multi module project
Now, initial configurations, installations and downloading parts are completed. Let’s move on to the implementation level.
- Open WSO2 Developer studio
- Create your workspace in a desired location.
- Now create 'Maven multi module project'
- In Maven-centric development, however, you have a parent project and some child modules, including a separate distribution module that is a child module of the parent project
- Click on 'Developer Studio' in the main menu -> You will get developer studio dashboard.
- Then select 'Maven Multi Module Project'

- Specify Group Id, Artifact Id and the Version.

Creating ESB Configuration Project
Now we need to create the child modules of that parent project created above. Let’s create the ESB configuration project first.
- Right click on the ‘Maven Multi Module Project’ that we have created and click on New -> ‘ESB Config Project’.
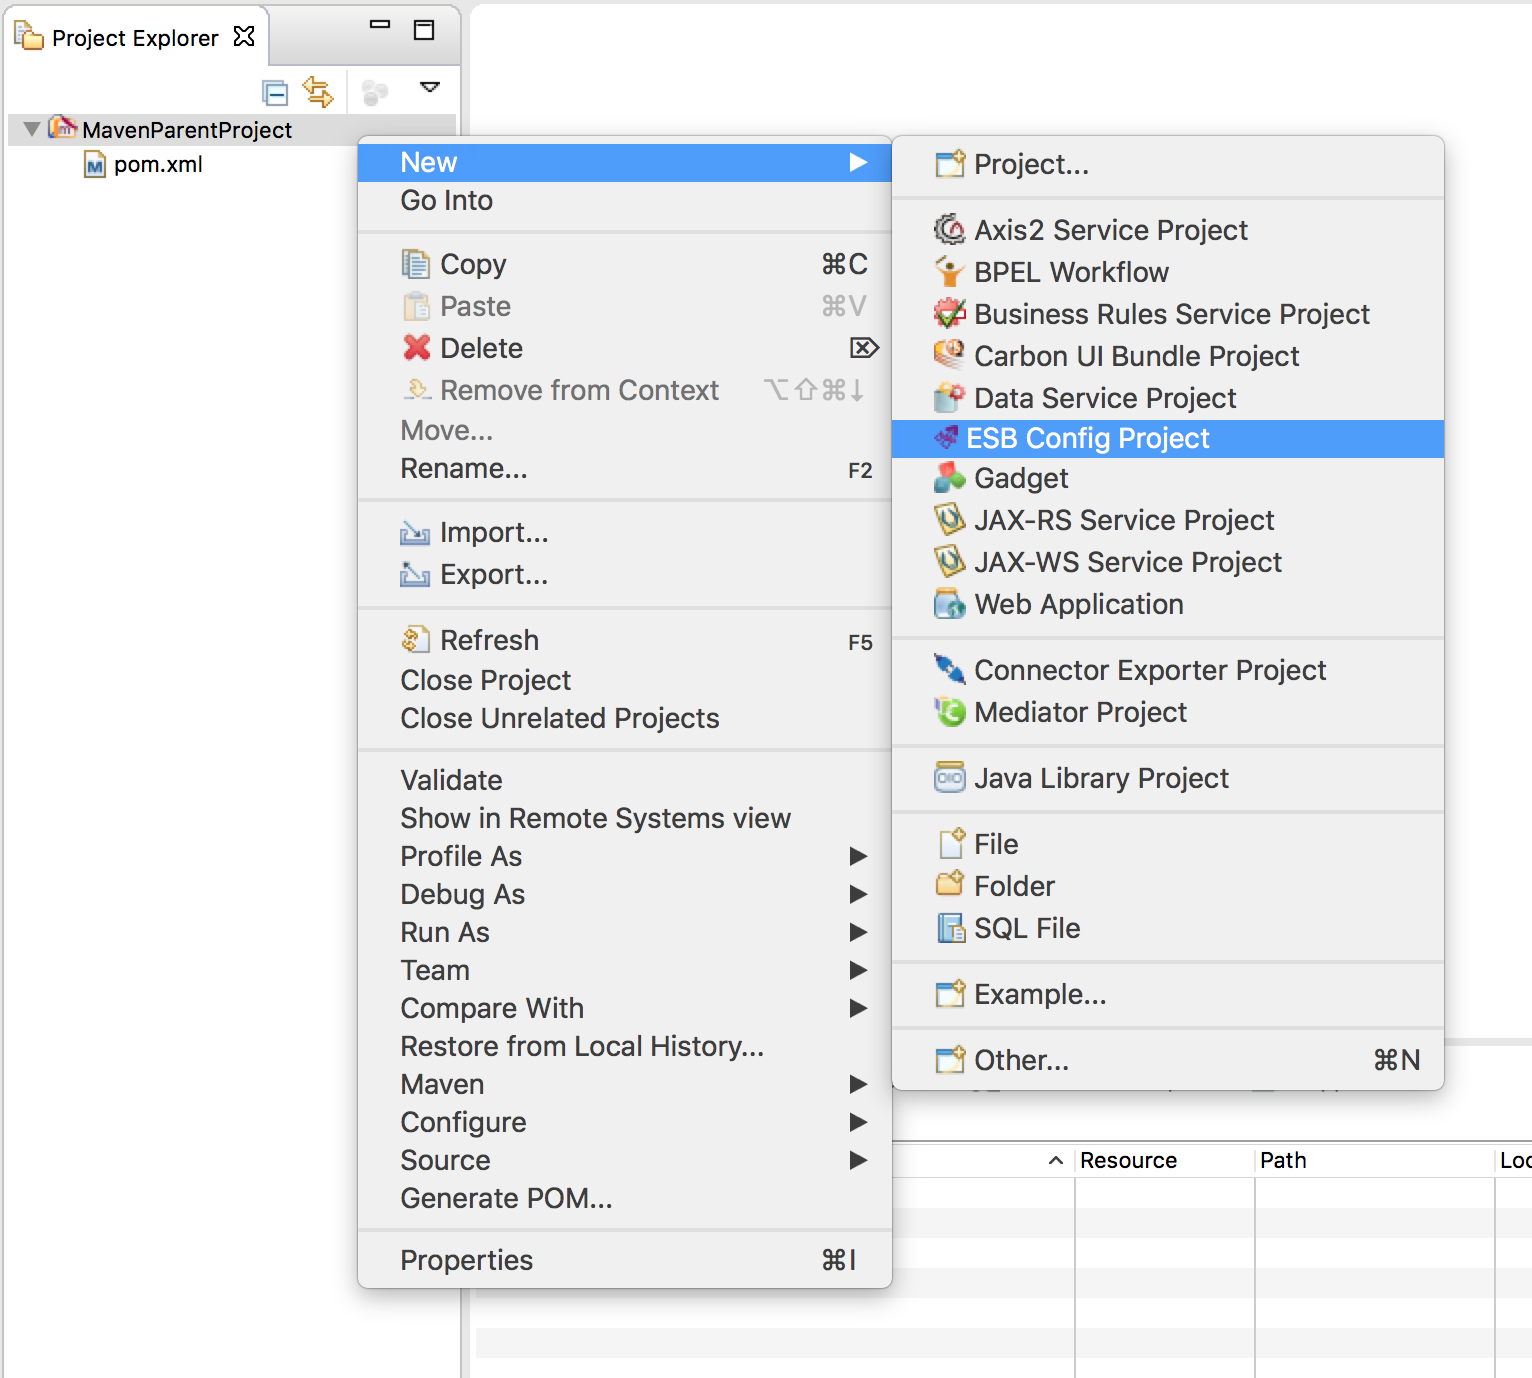
- Select ‘New ESB Config Project’.

- Give a project name.

- Then give the Group Id, Artifact Id and the project version

Now creating the ESB config project is completed, then add the connector to the project.
- Right click on ‘ESB Config Project’ -> Select Add or Remove Connector.

- Then Add Connector

- Browse the location of the connector that you have downloaded from the connector store in the initial step of this tutorial.

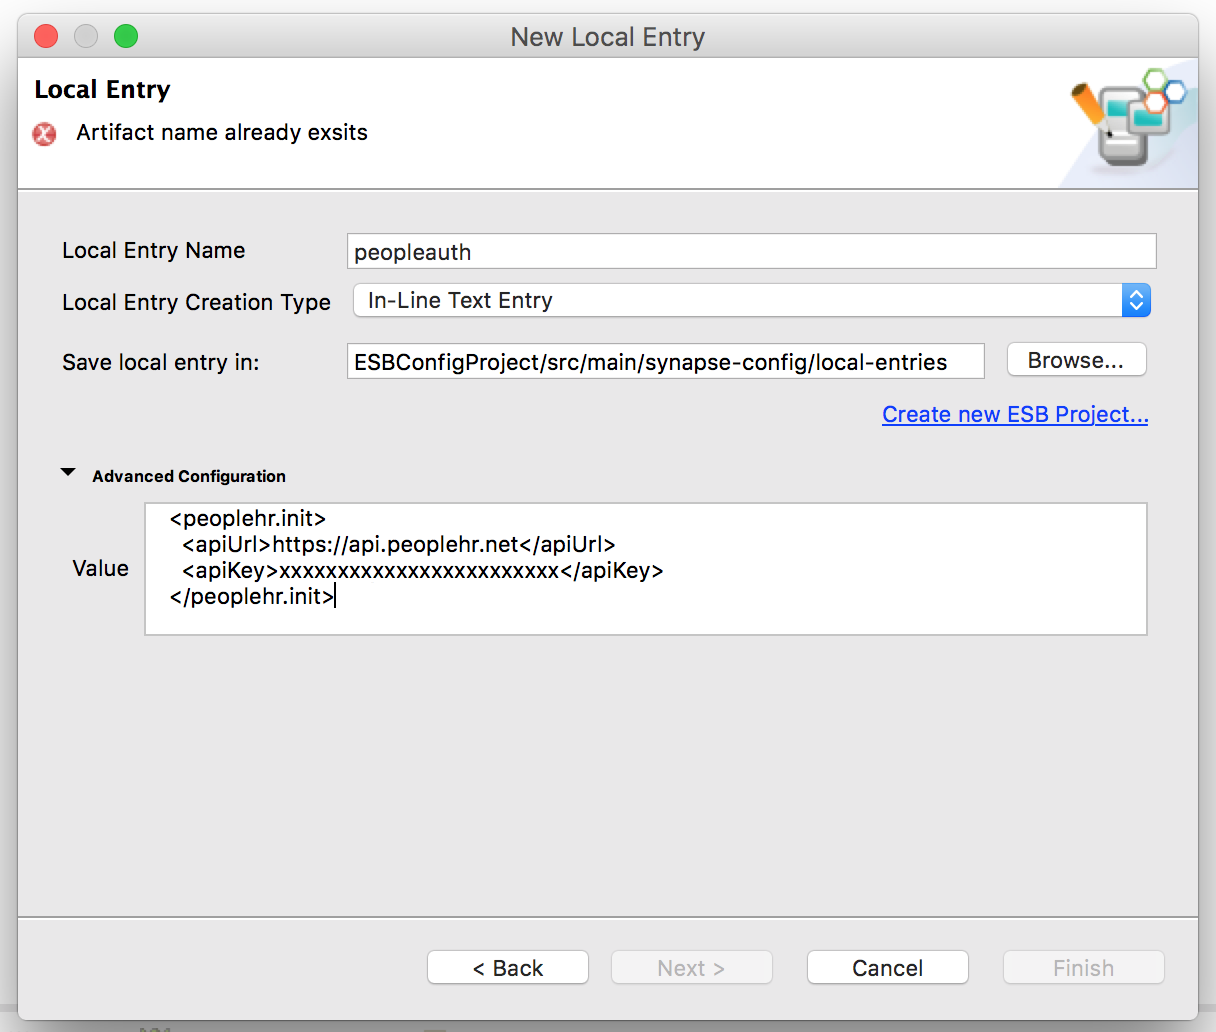
6. Now let’s add the ‘local-entries’ to the project.
The local registry acts as a memory registry where you can store text strings, XML strings, and URLs. These entries can be retrieved from a mediator.
- Expand the config project, this way you can view all the components of the project. Go to src -> main -> synapse-config -> local-entries -> New -> Local Entry

- Select - > Create a new local entry.
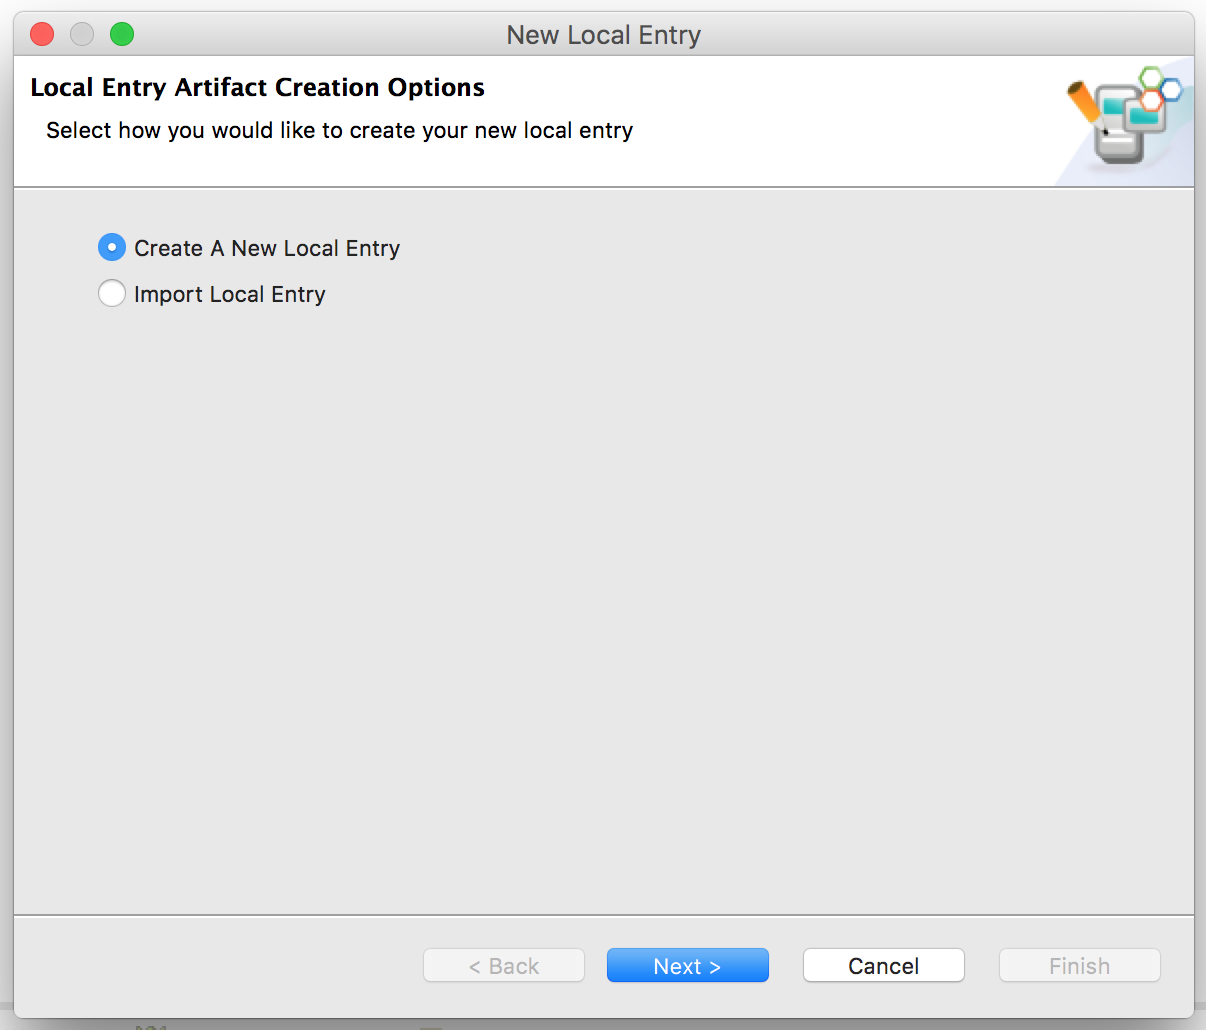
- Give Entry Name.
- Select Entry Creation Type as In-Line XML Entry.
- Keep the save path as it is.
- Copy the following code snippet to the value of Advance Configuration.
- apiUrl: The URL of the PeopleHR REST API.
- apiKey: The API key associated with the user account that we created at the initial step.
<peoplehr.init>
<apiUrl>https://api.peoplehr.net</apiUrl>
<apiKey>xxxxxxxxxxxxxxxxxxxx</apiKey>
</peoplehr.init>
<apiUrl>https://api.peoplehr.net</apiUrl>
<apiKey>xxxxxxxxxxxxxxxxxxxx</apiKey>
</peoplehr.init>
7. Now let’s create the proxy service.
- Go to src -> main -> synapse-config -> proxy services -> New -> Proxy Service
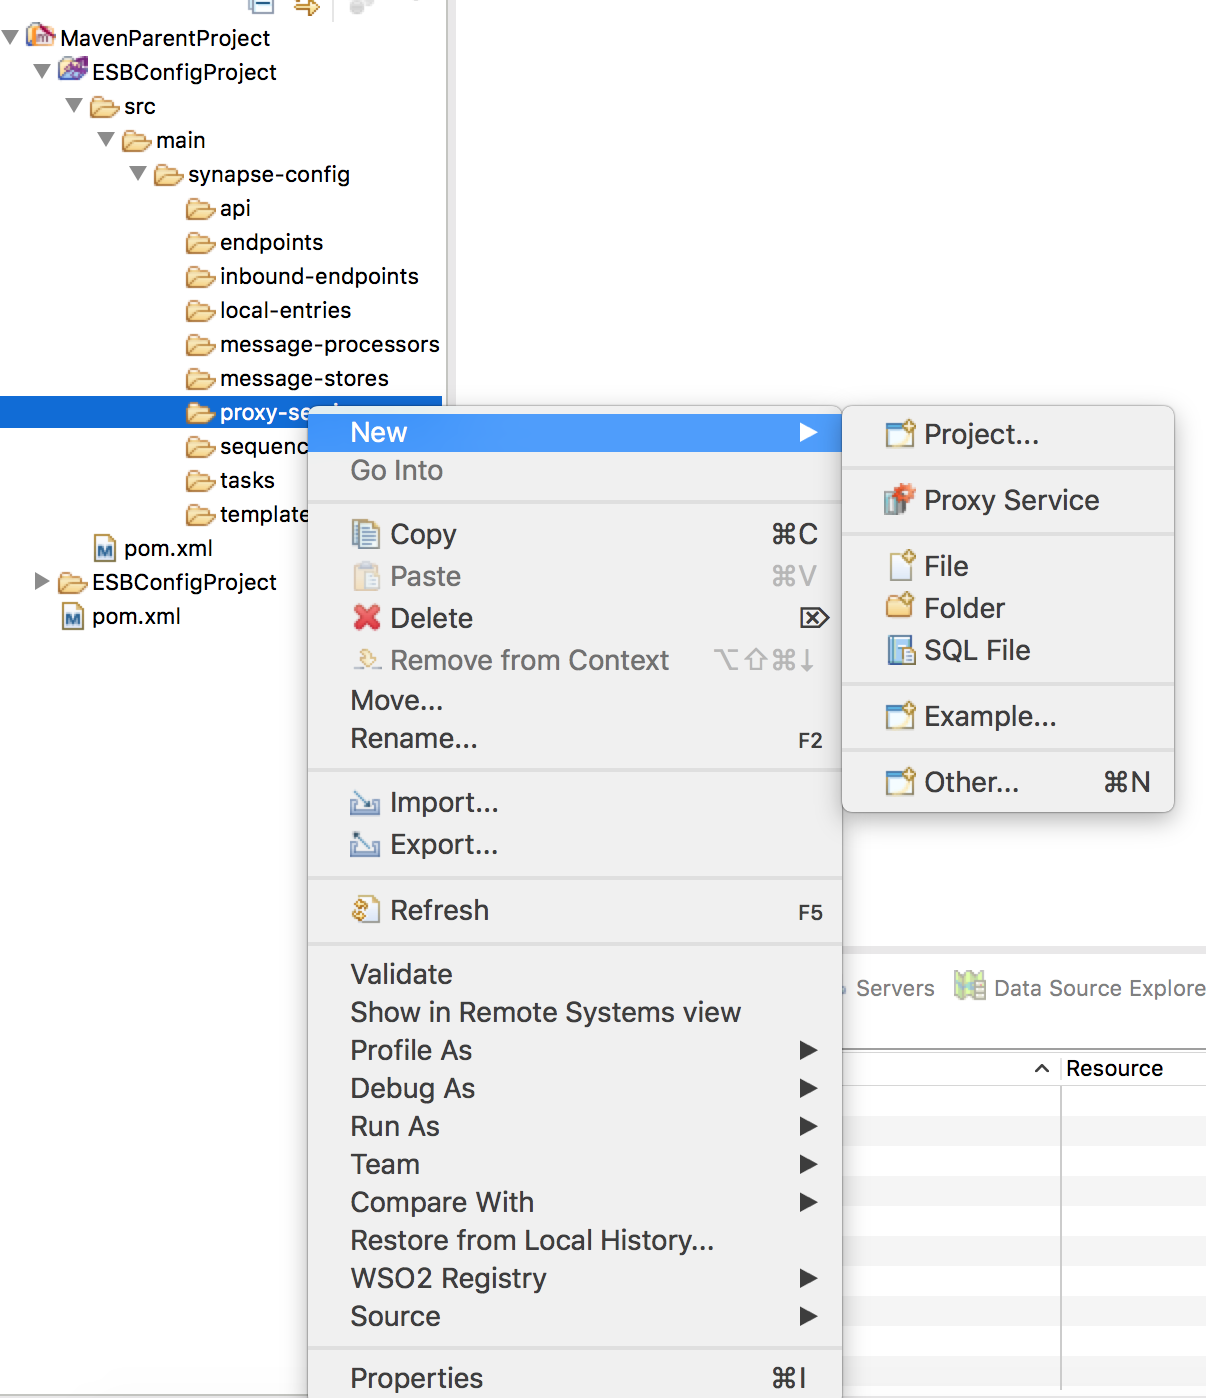
- Select create a new proxy service

- Give a proxy service name.
- Select ‘Proxy Service Type’ as Custom proxy.
- Keep the location as it is.

- Initially your proxy service looks like this.
- Added connectors (in here people HR connector) will show at the bottom of the palette.

- Click on the ‘Source’ Next to the ‘Design and it will look like this,
<?xml version="1.0" encoding="UTF-8"?>
<proxy name="PeopleHrProxy" startOnLoad="true" trace="disable"
transports="http https" xmlns="http://ws.apache.org/ns/synapse">
<target>
<inSequence/>
<outSequence/>
<faultSequence/>
</target>
</proxy>
Using Publish Event Mediator
- Replace the following code snippet in with the above code,
- Please make sure that you modify the <proxy name>, <queryName> and the <eventSink> name..etc, appropriately.
- Also, in here we are going to use the Publish Event mediator, which constructs events and publishes them to different systems.
- Enter a desired <streamName> and <streamVersion>, or keep it as it is.
[Note: Since the JSON element contains spaces and we cannot address space in XPATH, we’ll be using ‘local-name()’ to retrieve the values.]
<?xml version="1.0" encoding="UTF-8"?>
<proxy name="PeopleHrProxy" startOnLoad="true" trace="disable"
transports="http https" xmlns="http://ws.apache.org/ns/synapse">
<target>
<inSequence onError="faultHandlerSeq">
<peoplehr.query configKey="peopleauth">
<queryName>Retrieve Employee Info</queryName>
</peoplehr.query>
<iterate continueParent="true" expression="//jsonObject/Result"
id="MyIterator" sequential="true" xmlns:ns="http://org.apache.synapse/xsd">
<target>
<sequence>
<log level="full"></log>
<publishEvent>
<eventSink>DAS_EVENT_SINK</eventSink>
<streamName>PeopleEventStream</streamName>
<streamVersion>1.0.3</streamVersion>
<attributes>
<meta/>
<correlation/>
<payload>
<attribute defaultValue=""
expression="//*[local-name()='Employee Id']/text()"
name="EmployeeId" type="STRING"/>
<attribute defaultValue=""
expression="//*[local-name()='First Name']/text()"
name="FirstName" type="STRING"/>
<attribute defaultValue=""
expression="//*[local-name()='Last Name']/text()"
name="LastName" type="STRING"/>
</payload>
<arbitrary/>
</attributes>
</publishEvent>
<log>
<property expression="//*[local-name()='First Name']/text()" name="FirstName"/>
</log>
</sequence>
</target>
</iterate>
<respond/>
</inSequence>
<outSequence>
<send/>
</outSequence>
<faultSequence/>
</target>
<parameter name="ApplicationXMLBuilder.allowDTD">true</parameter>
</proxy>
After that your design view will look like this.

Creating Connector Project
To make the deployment easy, let’s add a connector project. Therefore we don’t need to add the connector separately to the ESB instance.
- Right click on the Maven Parent Project and select ‘Connector Exporter Project’

- Give the project name
- Keep the default location
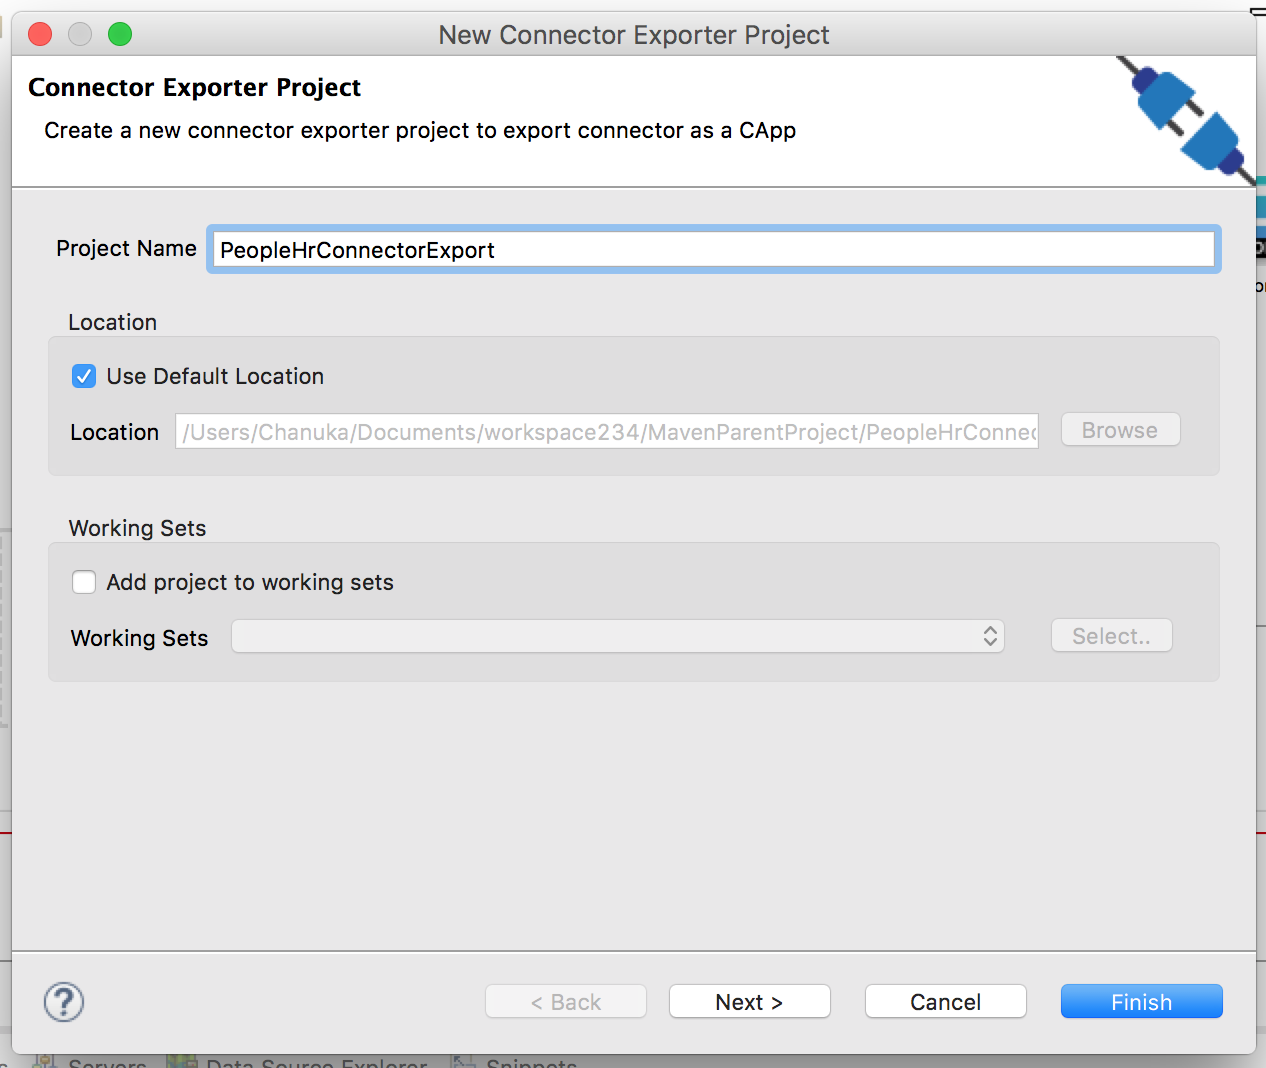
- Give, Group Id Artifact id and the version, Click ‘Finish’

Let’s add the connector to the connector project.
- Right click on the connector project -> New -> Add/Remove Connectors.
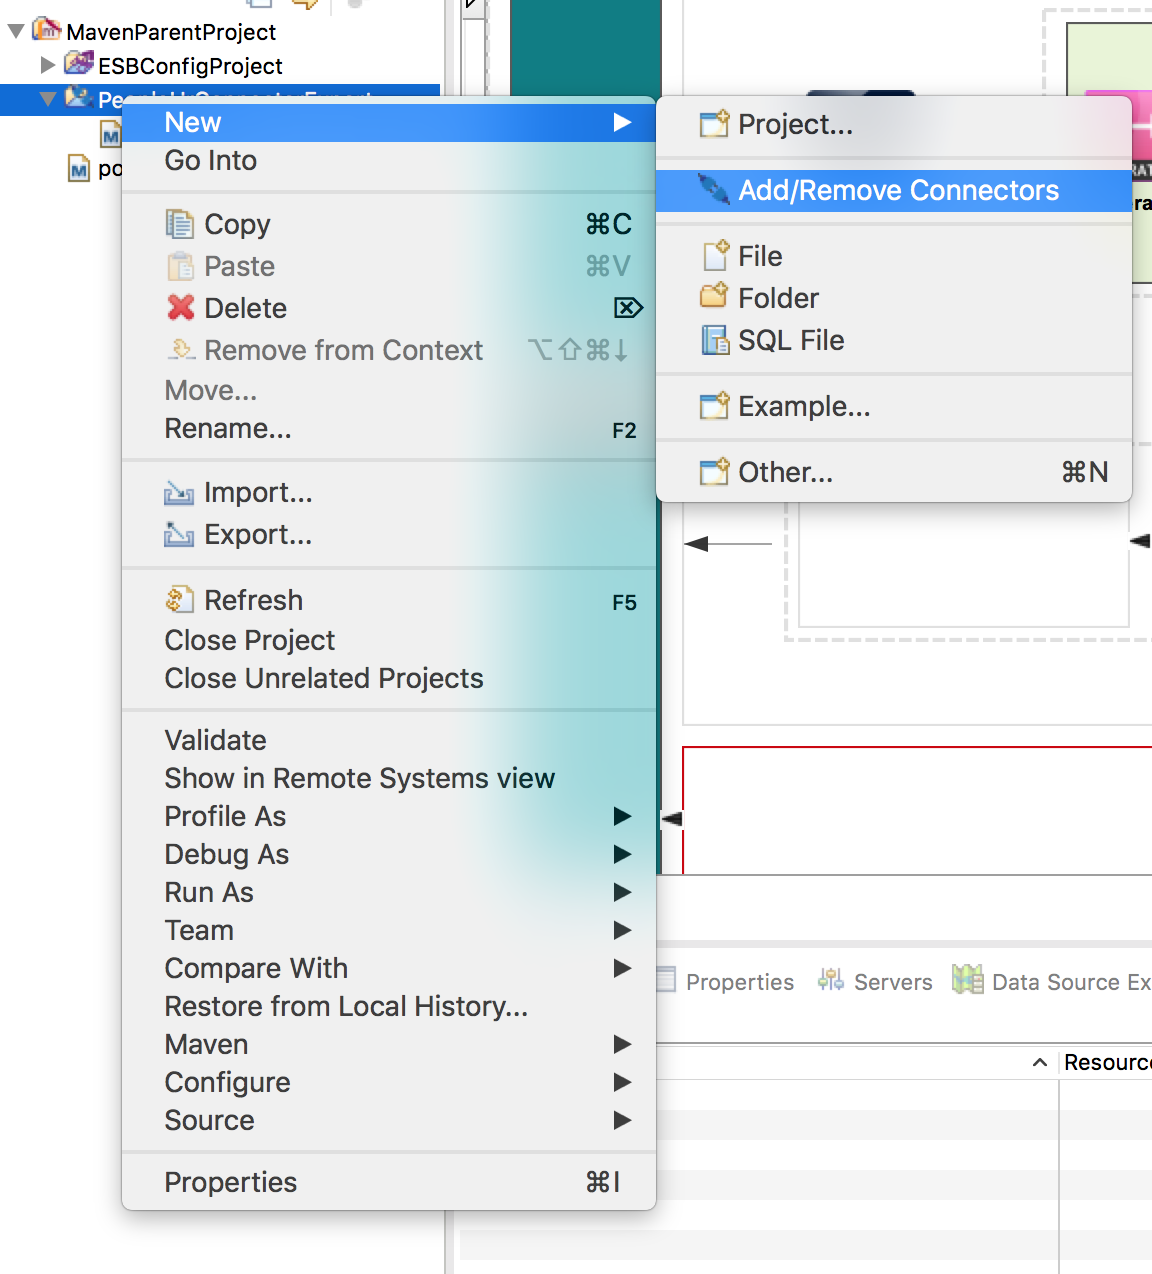
- Check ‘Add connector’

- Browse the people HR connector and add it.
- Click Finish.

Creating Composite application project (C-App)
Now let’s create the ‘Composite application project’ for the deployment purpose.
- Click on Developer Studio -> Dashboard - > select ‘Composite Application Project’’

- Give a name.
- Select relevant dependencies.

Give Group Id, Artifact Id and the Version. Click ‘Finish’

Adding remote server to developer studio
Now let’s add the ESB remote server to the Developer Studio Servers.
Note : ESB might be in your localhost or it can be a remote server, doesn’t matter keep it running.
- If the server window is not visible, click on Window - > Show View -> Servers

- Right click on the server tab and select New -> Server
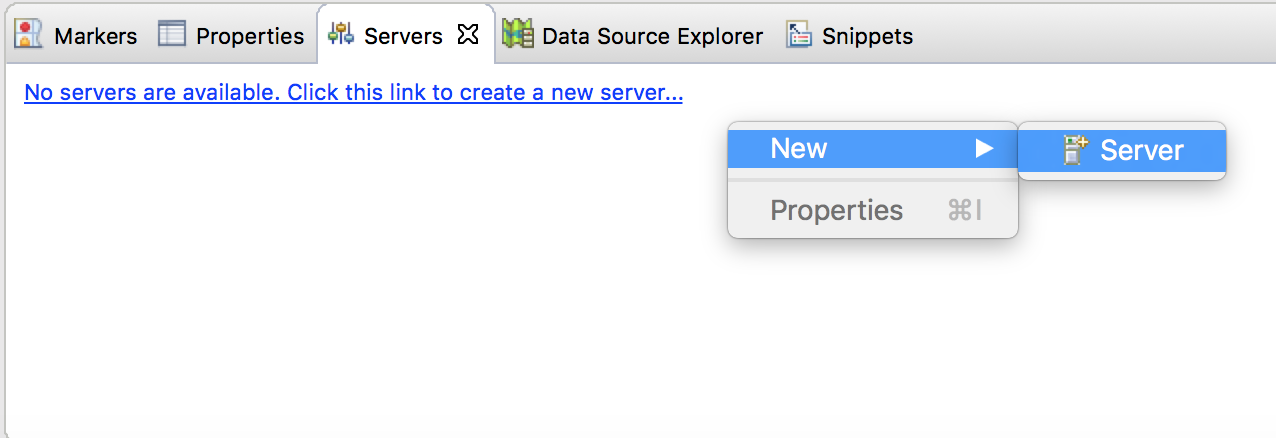
- Select WSO2 Carbon remote server.

- Give server url.
- Keep service path as it is.
- Give username, password to your ESB instance.
- Click ‘Finish’

- Now you can see your ESB server in the server tab.

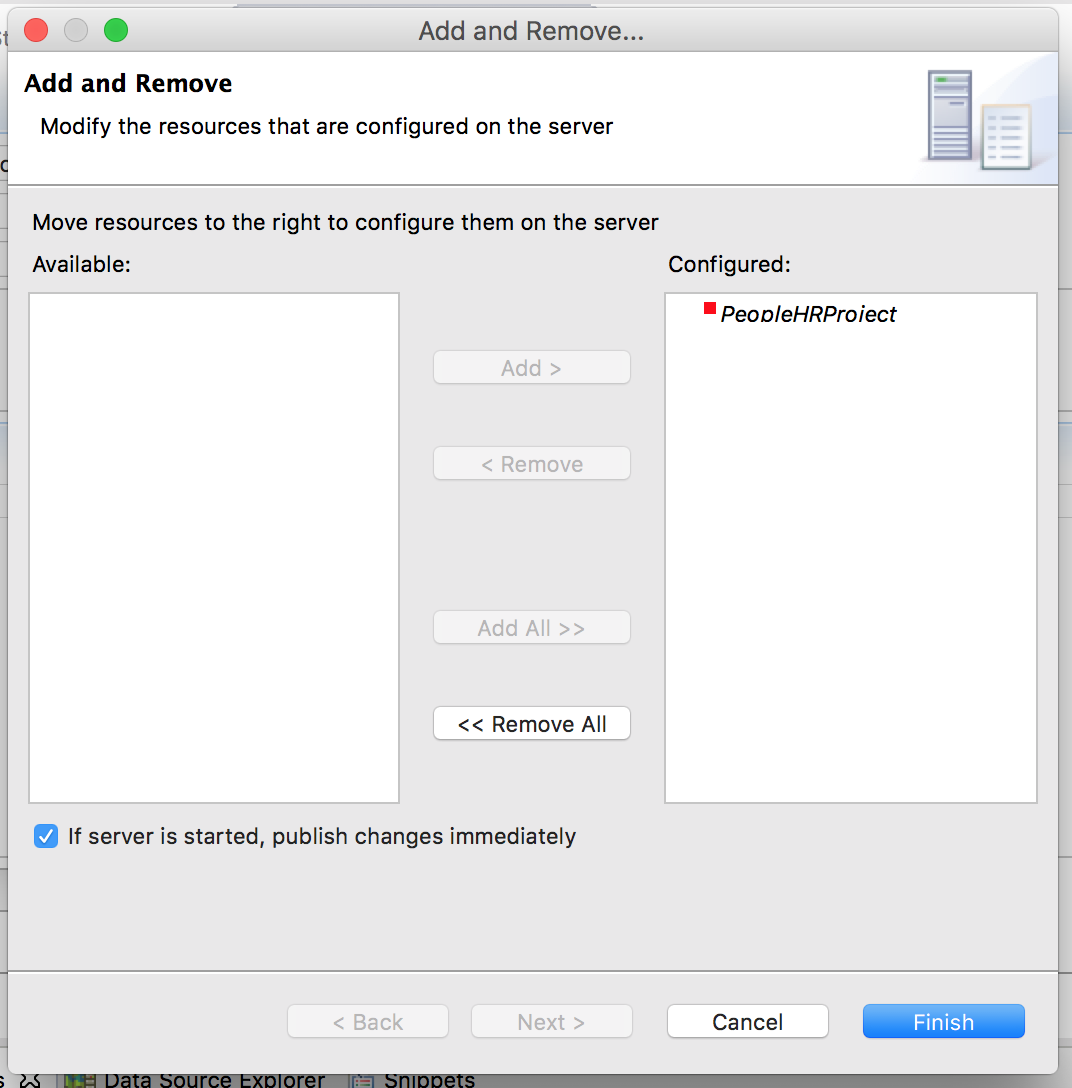
Deploying Composite Application Project (C-App) to a remote server
Let’s deploy the Composite Application Project (C-App) into our ESB server above.
- Right click on the added server -> select ‘Add and Remove’

- Select the C-App and click ‘Add >’ -> Finish
Now check the console it’ll show the deployed log info message.

If you have done some changes to the projects after the the deployment,
- Right click on the added C-App -> Click ‘Redeploy’

Let’s check whether our deployment is working correctly
Login to WSO2 ESB - > ‘Main’ menu -> Click ‘Services’ -> List

You will see the deployed ‘PeopleHrProxy’ in the list.
- Click on ‘Try this service’ of the ‘PeopleHrProxy’ service.
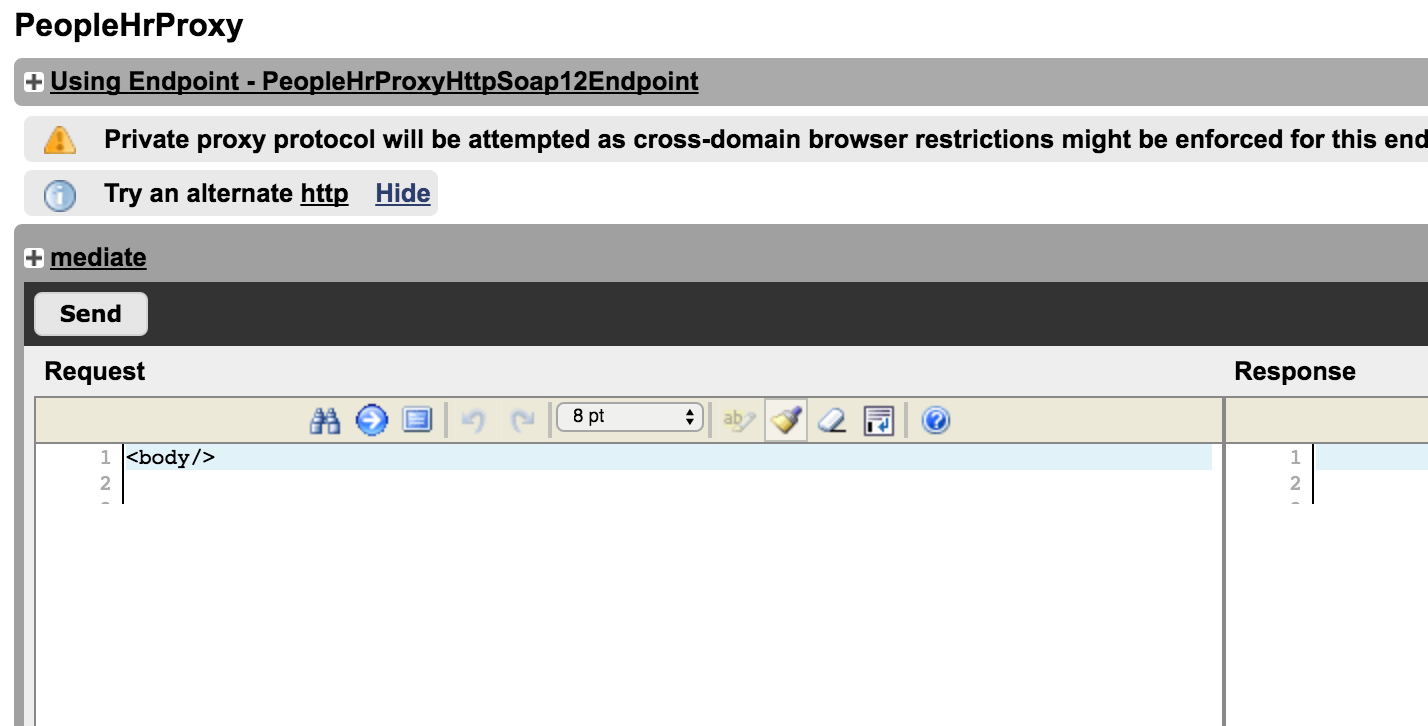
- Press ‘Send’, which will invoke our proxy service.
Because we have added a log level = ‘full’ and another log to the FirstName, in ESB log it’ show the result.

After that in the DAS log it’ll show that the event stream is successfully created.

- Go to DAS admin console - > Main menu -> Manage -> Streams.

You can see the ‘PeopleEventStream’ with the version, which we have specified in the proxy that we have created under <publishEvent>.
- Click ‘Edit’ of the stream.
Persist Data
You can see the ‘Payload Data Attributes’ that we have specified in the proxy service.

- Click on ‘Next [Persist Event]’

- Check ‘Persist Event Stream’ and all the Payload Data attributes that need to be persist. Which store them inside the DAS, once the data is received from the ESB side.
Now In-order to capture the stream data from the ESB side, we need to create a receiver for that.
Click on Receivers next to the Streams on the same menu - > Add new receiver.
- Give a name to the Receiver.
- Select ‘Input Adapter Type’ as wso2event.
- Select the event stream that we need to capture the data from (in here it’s PeopleEventStream).
- Select Message format as wso2event.
- Click ‘Add Event Receiver’

- Now go to the ESB Proxy service and run it again (using the same method).
After that it’ll show the same log in ESB log like before, when the data is received.
Then go to admin console.
- Main menu - > Interactive Analytics -> Data Explorer.

- Select Steam name from the ‘Table Name’ drop down.
- Click on ‘Search’
You will see the result as below.

Store data inside mysql datasource.
Now we need to save them inside the external MySQL server.
- Unzip and copy the mysql-connector jar file into the DAS Home -> repository -> components -> lib folder.
- Shut down the server before copying.
- Now start the server again.
- Create a MySQL database and a table (PEOPLE_HR) to insert:
- EmployeeId varchar , FirstName varchar, LastName varchar, and _timestamp date
Writing Spark Queries.
- Go to DAS server admin console, ‘Main’ menu -> Batch Analytics -> Scripts

- Give a name.
- And copy and paste the following Spark SQL Quiries:
create temporary table peopledata using CarbonAnalytics options (tableName "PeopleStremTest", schema "EmployeeId STRING , FirstName STRING, LastName STRING, _timestamp long");
create temporary table peoplehr using CarbonJDBC options (datasource "dashboard", tableName "PEOPLE_HR");
insert into table peoplehr select * from peopledata;
- Click on ‘Execute Script’
If the execution is successful, It’ll show the following message. Otherwise it’ll show you the error

You can seen that the data inserted to your MySQL table (Screen captured from MySQL workbench).

Creating Gadget
First we need to retrieve data for the gadget to display. Let’s create the API for that,
- Navigate to the <DAS_HOME>/repository/deployment/server/jaggeryapps/portal/controllers/apis directory.
- Create ‘peoplehr.jag’ file.
- Add the following code
<%
var database = new Database("dashboard");
var sqlQuery = "SELECT * FROM PEOPLE_HR;"
var results = database.query(sqlQuery);
print(results);
%>
- Go to your browser and check whether the data is coming (If there’s any error’s, those will log on DAS).
- Copy and paste following url in your browser (make sure to change the port if you change the offset).
Now let’s create the Gadget.
- Navigate to the <DAS_HOME>/repository/deployment/server/jaggeryapps/portal/store directory.
- There you can see the default tenants. Since we do not have a tenant let’s create a gadget in the super tenant.
- Go to super tenant ‘carbon.super’ directory - > gadget.
- Create a folder called people-hr-gadget
- Create a xml file inside that folder, let’s call it ‘index.xml’ (you can give any name for it)
- Copy the following code snippet to your xml file.
<?xml version="1.0" encoding="UTF-8" ?>
<Module>
<ModulePrefs title="people-hr-gadget" height="250" description="people-hr-gadget">
<Require feature="pubsub-2"/>
<Require feature="dynamic-height"/>
</ModulePrefs>
<Content type="html">
<![CDATA[
<head>
<script language="javascript" type="text/javascript" src="/portal/js/jquery-1.10.2.js"></script>
<script>
var url = "https://localhost:9445/portal/controllers/apis/peoplehr.jag";
$.get(url, {}).done(function (data) {
var peopleData = JSON.parse(data);
for (var k in peopleData) {
$('#peopleTable').append('<tr><td>Employee Id: </td><td>' + peopleData[k].EmployeeId +'</td></tr><tr><td>First Name: </td><td>' + peopleData[k].FirstName +'</td></tr><tr><td>Last Name: </td><td>' + peopleData[k].LastName +'</td></tr></tr>');
}
});
</script>
<head>
<body>
<div id="peopleDiv">
<table id="peopleTable">
<thead>
<tr>
<td style="font-weight: bold;">
Employee Details</td></tr>
<thead>
<table>
</div>
</body>
]]>
</Content>
</Module>
Now create a ‘gadget.json’ file with the following content.
- Make sure to copy the index.png to the directory. This the thumbnail picture (You can use your own image or copy a image from another gadget directory).
{
"id": "people-hr-gadget",
"title": "people-hr-gadget",
"type": "gadget",
"thumbnail": "store://gadget/people-hr-gadget/index.png",
"data": {
"url": "store://gadget/people-hr-gadget/index.xml"
}
}
Create Dashboard
- Go to following url.
https://localhost:9445/portal/
- Click on ‘Create Dashboard’
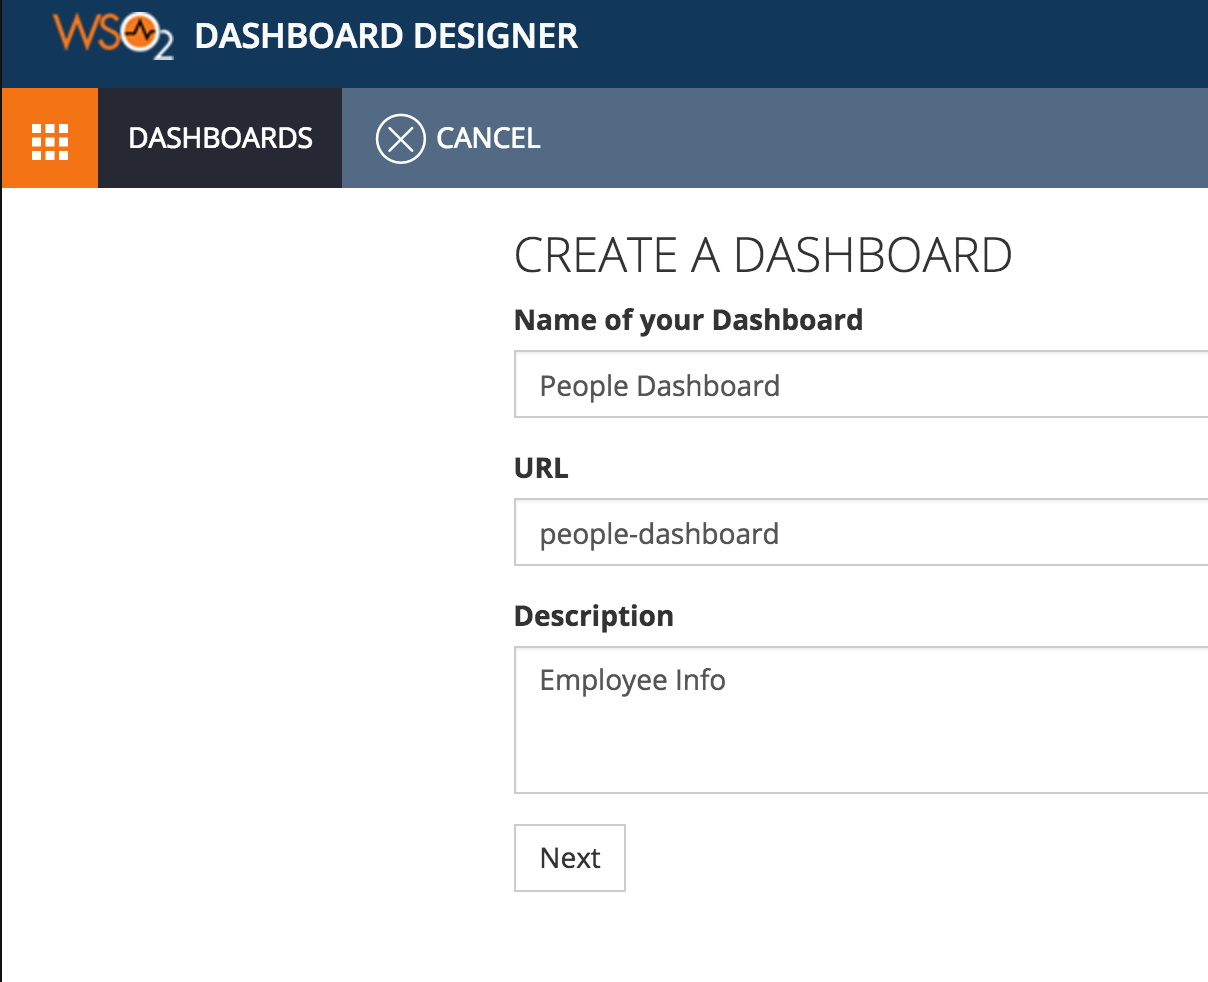
- Give a name and description, keep generated url as it is.
- Click ‘Next’ -> Select a Layout (select any layout)
Now Let’s add the gadget.
- Click on gadgets icon on left side menu (pie chart icon). Scroll down until you see the ‘people-hr-gadget’.

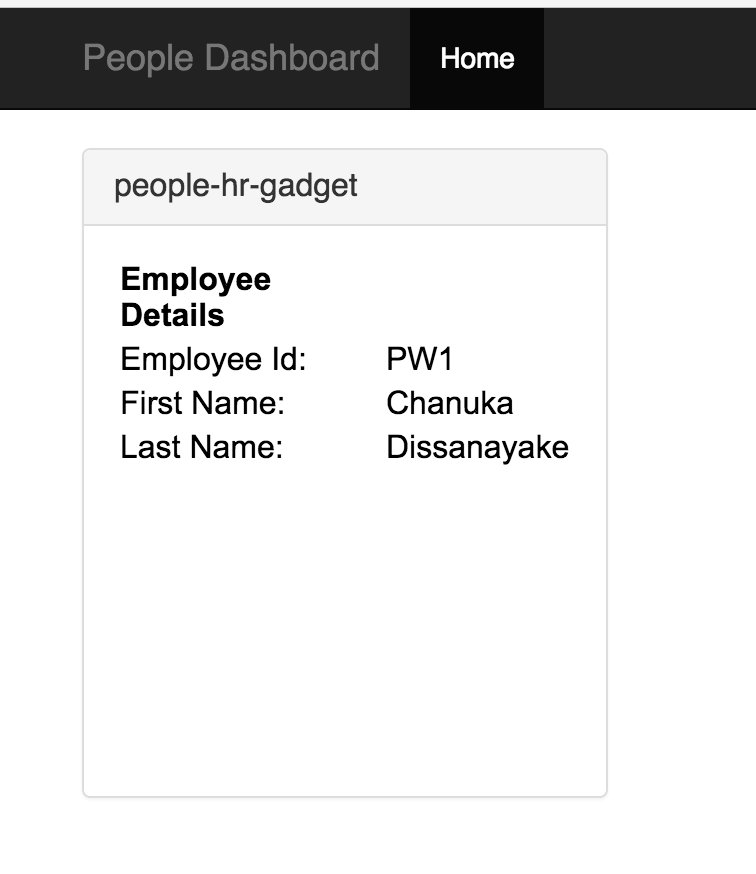
- Drag and drop the gadget to the dashboard layout.
Now you can see the data has been populated.
(This is plain text. You can add your own stylesheet and js..etc., inside the gadget folder and refer them.)

Click on preview. You will see you dashboard preview.
Running schedule task
In order to write the data to database regularly. You need to schedule the following task.
Next we have to manage those dashboard. Let’s wait a little bit for the GA release of the IOT server. :)
References:

Well explained !!
ReplyDelete